OpenVPN Layer 3 Routed container guide
Introduction
Unwired provides a tested and maintained OpenVPN Layer 3 container as part of the service offering.
It is available to customers via the OpenVPN Layer 3 Routed (UW) container image.
This guide demonstrates how to set up and run this OpenVPN Layer 3 (L3) client container.
The primary objectives include:
Connecting to an OpenVPN server using a given configuration file.
Routing all traffic from the LAN interface through the OpenVPN server.
Adapting the OpenVPN configuration to enable multi-factor authentication (MFA) with a username and password.
Utilizing custom scripts (e.g.
/config/up.shand/config/down.sh) for configuration.
Prerequisites
Before proceeding, ensure you have the following:
Access to the Unwired Edge Cloud with a suitable (test) environment set up. Alternatively you can use a container runtime environment (e.g. Docker or OCI)
The
opensslcommand-line tool installed on your system.Access to an OpenVPN server and its configuration.
Basic knowledge of GraphQL queries.
Adding the OpenVPN container
Create a network uplink for the container, either
use NAT for regular connectivity.
for reliable, aggregated uplinks across multiple modems or Ethernet connections, select CloudLink.
Attach the container
OpenVPN Layer 3 Routed (UW)to the uplink:Optionally, attach a LAN side to the container.
Save the configuration:
Press
Save Configurationto persist the Container ID.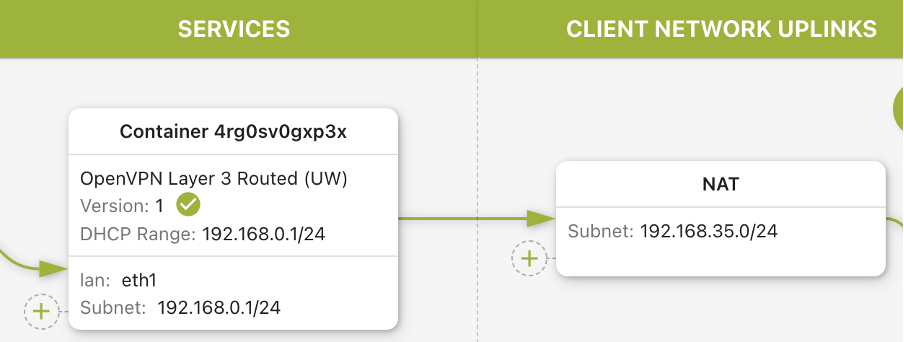
Set the container version inside the Unwired Edge Cloud developer playground: Ensure stable operations by updating the rollout configuration:
mutation DM_update_node_service_instance_rollout_config {
  DM_update_node_service_instance_rollout_config(
    # Container ID from above
    node_service_instance_ids: [
      "4rg0sv...",
    ]
    # Get the current version from the container before
    version_target_selector: {
      value: "version:1"
    }
  )
}
Configuring the OpenVPN container
Warning
All files MUST BE saved with Unix Line breaks (
LF).
If the files are saved in Windows format (CRLF), the container WILL NOT start.All shell scripts need to be executable. Otherwise, your container WILL NOT start.
To configure your OpenVPN container, you have to prepare all configuration files.
The following configuration files will be available.
Configuration files overview
/vpn/vpn.conf.. Main OpenVPN configuration (required)/config/up.sh.. Will be called from the OpenVPNupscript with the same arguments (MUST be executable!) (optional)/config/down.sh.. Will be called from the OpenVPNdownscript with the same arguments (MUST be executable!) (optional)
* Please refer to the Reference manual for OpenVPN for further information on the use of scripts.
OpenVPN main configuration
Use the openssl command-line tool in the following way for all your configuration files.
cat vpn.conf | openssl base64 -e -A
Use the base64-encoded output in subsequent steps.
Notes on using multi-factor authentication
In a standard setup, it is recommended to use certificate-based authentication.
In case you also have a username and password, follow these steps.
Add
auth-user-pass /vpn/credentials.txtto yourvpn.conffile prior to base64 encoding it.Add a
credentials.txtfile with the following content# ATTN: This requires "auth-user-pass /vpn/credentials.txt" in vpn.conf myusername mypassword
Additional scripts
OpenVPN can execute external scripts in various phases of the lifetime of the OpenVPN process. Please refer to the Reference manual for OpenVPN for further information on the use of scripts.
Example /config/up.sh
#!/bin/sh

iptables -I OUTPUT -d 192.0.2.0/24 -j DROP    # Example TEST-NET-1 iptables rule
ip addr add 198.51.100.1/24 dev eth1 || true  # Example TEST-NET-2 IP address
Example /config/down.sh
#!/bin/sh

iptables -D OUTPUT -d 192.0.2.0/24 -j DROP    # Clean up example TEST-NET-1 iptables rule
ip addr del 198.51.100.1/24 dev eth1 || true  # Clean up TEST-NET-2 IP address
Importing the configuration
To finish the container configuration, you will have to
Convert all files into base64 format.
Use
DM_update_node_service_instance_config_mountsto configure your container.
cat vpn.conf | openssl base64 -e -A
cat credentials.txt | openssl base64 -e -A
cat up.sh | openssl base64 -e -A
cat down.sh | openssl base64 -e -A
Import the configuration using the following mutation.
Please note that the configuration files set specific permissions using the mode: attribute.
mutation OpenVPN_device_A {
  DM_update_node_service_instance_config_mounts(
    id: "4rg0sv...",  # Container ID from above
    config_mounts: [
      {  mount_path: "/vpn/vpn.conf",
        mode: 256,  # = 400 unix octal, restricted access
        value_base64: "<base64 vpn.conf configuration>",
      },
      # /vpn/credentials.txt is only required if you need a username & password
      #{  mount_path: "/vpn/credentials.txt",
      #  mode: 256,  # = 400 unix octal, restricted access
      #  value_base64: "<base64 credentials.txt configuration>",
      #},
      {  mount_path: "/config/up.sh",
        mode: 488,  # = 750 unix octal, must be executable
        value_base64: "<base64 up.sh configuration>",
      },
      {  mount_path: "/config/down.sh",
        mode: 488,  # = 750 unix octal, must be executable
        value_base64: "<base64 down.sh configuration>",
      },
    ]
  )
}
Troubleshooting
If your container is not functioning correctly, checking the following things might be helpful.
Server side
OpenVPN configuration
Verify all parts of the OpenVPN configuration including server-side configuration and exported configuration.
Use an OpenVPN client on your laptop to ensure that the configuration is working properly.
Check the routes that you push to the OpenVPN client.
Check the log files of the OpenVPN server.
Firewall
Verify the firewall rules on your OpenVPN server and network to ensure connections are NOT blocked.
Use a network analysis tool to check if the container tries to establish a connection to the OpenVPN server.
Container configuration
File format: Ensure the config files are properly encoded with UNIX line endings (
LF).File permissions: Verify that mounted files have the correct UNIX permissions (read, executable).
If your issues persist, please reach out to support@unwirednetworks.com.
OpenVPN changelog
The following table lists changes per version available in the Unwired Edge Cloud Console.
Version |
Date |
Changes |
|---|---|---|
1 |
2024-10-29 |
Initial release |